When it comes to finding a bug in an app, few things beat a good trail of logs. And for writing those logs, few tools beat NLog in simplicity or flexibility. I rarely appreciate just how flexible it is though, so it’s worth spending a little time taking a closer look.
Generally when I’ve used NLog, I configure it the same ol’ way.. writing logs to a file. To use NLog’s vernacular, I target a file.. but there are a lot of other possible targets too. In fact there’s nearly a hundred as I write this.
In this post I’ll use three of them in a WinForms app, to target a file, an API, and a MessageBox. Yep, you can actually display certain logs to a user, if you had a reason for wanting to do it.
Getting Started#
I’ve written about using NLog for logging in WinForms before, and I think that’s still a decent enough tutorial for getting started, so I won’t rehash it here. The NLog readme and wiki has a ton of resources as well, like this one for getting started on the .NET Framework.
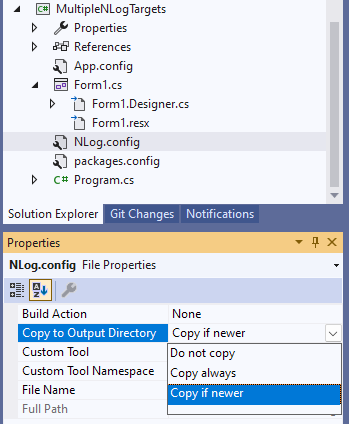
If you’ve got everything configured but nothing’s happening, double-check that the NLog.config file is set to copy to the output directory. If it’s not in the bin folder when the app runs, nothing’ll happen. Otherwise, follow their troubleshooting doc.
Configuring Multiple Targets#
As I just mentioned, there’s three targets I’ll show off:
- File target · NLog (send a message to a file on disk)
- MessageBox target · NLog (popup a message to the user)
- NLog.Targets.HTTP · DarekDan (send a POST to some end point)
The first two are from the NLog team, and the third one is from someone else (Dariusz Danielewski). It’s awesome that anyone can create their own targets, but it’s also prudent to give any code from a third-party a cursory review at least. NLog has it listed on their site, so I’d hope they at least vetted it out initially, but anything can change over time.
In general, all the targets are good about including a short section that shows how to modify your nlog.config file to get things running, and the above three are no exception. Here’s what my config file looks like after adding them.
<?xml version="1.0" encoding="utf-8" ?>
<nlog xmlns="http://www.nlog-project.org/schemas/NLog.xsd"
      xmlns:xsi="http://www.w3.org/2001/XMLSchema-instance">

  <extensions>
    <add assembly="NLog.Targets.Http" />
  </extensions>

  <targets>
    <target name="logfile" xsi:type="File"
            fileName="file.txt" autoFlush="true" />
    <target name="logmsg" xsi:type="MessageBox"
            caption="${level} Message (${shortdate})"
            layout="${message}" />
    <target name="logapi" xsi:type="HTTP"
            URL="http://localhost:5112/log"
            ContentType="application/json">
      <layout type="JsonLayout">
        <attribute name="sourcetype" layout="_json" />
        <attribute name="host" layout="${machinename}" />
        <attribute name="event" encode="false">
          <layout type="JsonLayout">
            <attribute name="level" layout="${level:upperCase=true}" />
            <attribute name="source" layout="${logger}" />
            <attribute name="thread" layout="${threadid}" />
            <attribute name="message" layout="${message:withexception=true}" />
            <attribute name="utc" layout="${date:universalTime=true:format=yyyy-MM-dd HH\:mm\:ss.fff}" />
          </layout>
        </attribute>
      </layout>
    </target>
  </targets>

  <rules>
    <logger name="*" minlevel="Trace" writeTo="logfile" />
    <logger name="*" minlevel="Info" writeTo="logmsg" />
    <logger name="*" minlevel="Error" writeTo="logapi" />
  </rules>
</nlog>
There’s a few interesting things to note in the above config:
- The name and type are on every target, but other attributes vary.
- The third-party target, for posting to an endpoint, requires an entry in a separate “extensions” node. I assume it’s because NLog knows to check for its own extensions, but needs a hint that other ones are being used.
- Note the URL for the HTTP target. That’s a minimal API I wrote for demo purposes, which you can find in the code if you clone it… it’s also using NLog to write to its own file.
- The “rules” section at the bottom says to log everything to a local file, show anything informational or above to the user (they don’t need to see debug or trace messages), and post any exception/critical messages to an external API (no need to send everything across the wire).
Using Multiple Targets#
Adding a minimal amount of code, like below, is enough to get started. Easy!
private readonly Logger logger;

public Form1()
{
    InitializeComponent();

    logger = LogManager.GetLogger("");
}

private void btnLogTrace_Click(object sender, EventArgs e)
{
    logger.Log(LogLevel.Trace, txtMessage.Text);
}

private void btnLogWarning_Click(object sender, EventArgs e)
{
    logger.Log(LogLevel.Warn, txtMessage.Text);
}

private void btnLogException_Click(object sender, EventArgs e)
{
    try
    {
        throw new Exception(txtMessage.Text);
    }
    catch (Exception ex)
    {
        logger.Log(LogLevel.Error, ex);
    }
}
Better yet, if you decide to add more targets later, you can do it with minimal (or no) changes to your code. Below is part of my Form.. since I didn’t give the various loggers names, and I don’t specify one in the constructor below, they all apply all the time, filtered only by the “minlevel” attributes in the config file.
The “layout” section in the HTTP target produces JSON like this, which gets passed to the API and is logged on that side.
{
    "sourcetype": "_json",
    "host": "SOME-MACHINE-NAME",
    "event": {
        "level": "ERROR",
        "thread": "1",
        "message": "Testing.. testing.. 123 testing...",
        "utc": "2023-06-29 21:06:03.476"
    }
}
Once it’s on that side, you can format the message however you like, as I’ve done below in the “/log” endpoint.
app.MapPost("/log", async (HttpRequest request) =>
{
    var payload = await request.ReadFromJsonAsync<AppLog>();

    var logMsg = $"{payload.Event.UTC}|{payload.Host}|{payload.Event.Level}||({payload.Event.Thread}) {payload.Event.Message}";

    logger.Log(LogLevel.FromString(payload.Event.Level), logMsg);
});
Seeing it in Action#
If you’re dealing with a distributed app, having it send some logs to a central location will make it a lot easier to know about and debug critical issues faster.
Here’s a short demo showing it in action. There are buttons in the Form to send messages of all varying levels, from trace to fatal. The textbox is just to simulate the informational message an app might show to the user, or a friendlier message that might get attached to an exception.
The file in the top half of VS Code is what’s getting logged by the WinForms app on the client side. The file in the bottom half is being logged by the API after the desktop app sends it a log.
If you give it a try and have any thoughts to share, or you discover something really cool or surprising, feel free to reach out in the comments below!